How to Adapt Garden Tools for Better Grip (DIY & Attachments)
As an Amazon Associate I earn from qualifying purchases. This page contains affiliate links — if you buy through them, I earn a small commission at no extra cost to you.
When a trowel slides out of your hand like a wet fish, it is the sort of frustration that makes you think about hanging up the spade for good. The handles that felt solid decades ago can suddenly feel slick and uncooperative under stiff or arthritic fingers. But you do not need to replace your entire shed. With a few basic materials, you can adapt the tools you already own to give you a secure, comfortable grip without the strain.
Why Do Garden Tools Slip When Your Grip Weakens?
Tools slip because the friction between your hand and the handle is no longer strong enough to overcome the weight of the tool and the resistance of the soil. As we get older, or if conditions like arthritis affect our hands, we naturally lose some grip strength and our skin texture changes. To compensate, we end up squeezing much harder in a tight “claw” grip, which quickly strains the wrist and forearm.
📺 Watch: Secrets to Injury-Free Gardening: Will Harlow LIVE at Froyle Gardening Club — Will Harlow – Over-Fifties Specialist Physio
The fix is mechanics, not muscle. By increasing the handle’s surface area and adding a non-slip texture, you raise the friction. Think of it like a rubberised tyre on a wet road. A smooth metal or plastic shaft offers nothing to hold onto, especially on a chilly morning, but adding a tactile layer changes the physics so the tool does the work, not your joints. The charity Arthritis UK rightly points out that adapting your grip and spreading the load are some of the most effective ways to protect your joints while staying active.
Method 1 – The “Plumber’s Tape” Hack (DIY)
If you need a fix that is quick, cheap, and reversible, plumber’s (PTFE) tape is a surprisingly effective ally.
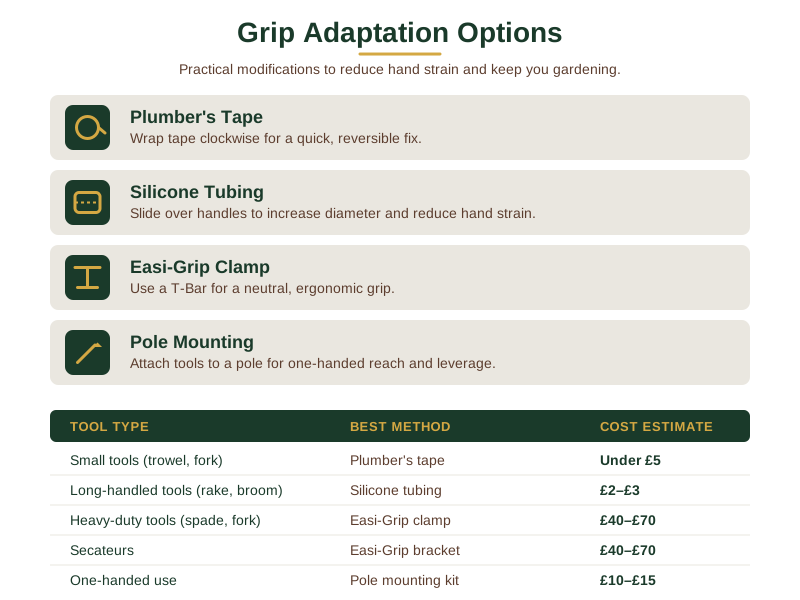
- What to buy: A roll of white plumber’s tape – most B&Q and Wickes shelves stock the standard 12-metre roll for around £3–£4.
- How to do it:
- Start at the base of the handle, where your palm meets the shaft.
- Pull the tape taut and wrap it clockwise in a tight spiral, overlapping each turn by about a quarter of the tape width.
- Work your way up to the end of the grip, keeping the tension even so the tape does not bunch.
- When you reach the top, press the final layer firmly with your thumb to smooth any ridges.
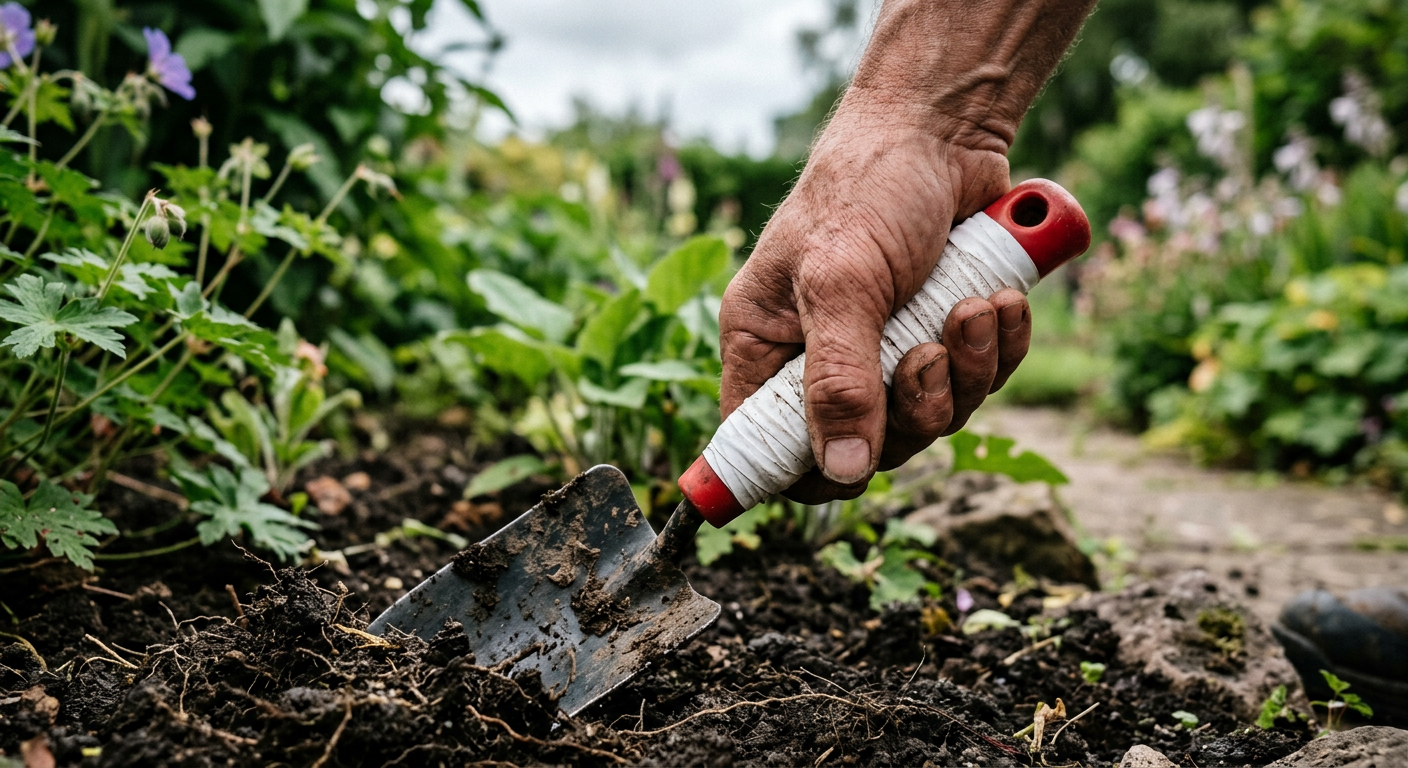
The tape’s microscopic texture creates a non-slip surface that stays in place even when your hands get sweaty. Wrapped around a slick plastic trowel handle, it turns a smooth grip into something with real texture to hold onto — no more losing your grip halfway through a job. And because it grips itself rather than using an adhesive, it peels off cleanly later if you ever want to sell or pass the tool on.
Best for: Small-handed tools like trowels, hand forks, and small secateurs.
Cost: One 12-metre roll runs to around £3–£4 and will cover several handles with plenty left over.
Method 2 – Tubing and Grip Enhancers (DIY)
When plumber’s tape feels a bit too thin or you want a softer feel, rubber or silicone tubing does the trick. Increasing the diameter of the handle means your fingers do not have to curl as tightly, which immediately takes the pressure off aching knuckles.
- What to buy: ½-inch inner-diameter silicone tubing (from a garden centre or DIY store) or foam grip sleeves. A 2-metre length runs about £2–£3.
- How to do it:
- Cut a length that will run from the base of the handle to just beyond the working end.
- Slide the tube over the handle. If the fit is loose, tighten it with a strip of electrical tape or a zip-tie near the base.
- For long-handled tools like rakes or brooms, you may need to secure the tube at two points to stop it slipping down under load.
The cushioning effect reduces hand fatigue, while the textured outer surface adds friction. Even on a heavy-duty fork used for digging potatoes, a simple piece of tubing on the handle is often enough to stop the wrist cramping within the first ten minutes of work.
Best for: Long-handled tools where you need a bit of give, such as rakes, brooms, and long-handled forks.
Cost: Around £3 for a suitable length of tubing.
Warning: Make sure the tube is not too slick on its own; a few small ridges or a knurled inner surface help it stay put in damp weather.
Method 3 – The Peta Easi‑Grip Add-On Handle
For arthritic hands, padding a handle only gets you so far – sometimes the angle of the grip itself is the problem. Peta, the family firm behind the Easi-Grip range, makes an add-on handle built for exactly this: an angled ergonomic grip that clamps onto a tool you already own using two adjustable hose clamps, rather than a whole new tool.
Because the angle does the work rather than the tape or tubing, it keeps your hand and wrist closer to a neutral position instead of forcing a downward twist to dig or pull. It clamps onto straight shafts up to roughly 40mm (1.5 inches) across, which covers the great majority of trowels, hand forks, hoes, and rake handles. Secateurs are the exception – their pivoting double handles are not the straight shaft this clamp is designed for, so the fix there is a different tool rather than an attachment. The Felco 7 (paid link) is worth a look: its handle revolves on its own axis as you cut, which Felco says cuts the force needed by up to 30% and takes a lot of the twisting strain off the wrist and thumb during a long pruning session.
View Felco 7 on Amazon → (paid link)
Cost: A single add-on handle is genuinely inexpensive – Peta’s own price list runs from around £5 up to roughly £18 depending on size, with spare clamps sold separately for a couple of pounds. If you would rather buy tools with the angle built in from the start, Peta also sells complete Easi-Grip trowels, forks, cultivators, and weeders individually (around £17 each, or £60 for a set of four), plus long-reach versions for around £35 each for anyone who struggles to bend. It is a smaller outlay than most people expect for a dedicated ergonomic system.
One‑Handed Gardening Modifications
Recovering from a stroke, an injury, or joint replacement surgery changes the maths on all of this. Your GP or an occupational therapist is always the best first port of call for anything condition-specific, and the gardening-for-health charity Thrive is a genuinely useful resource on top of that.
Mechanically speaking, standard garden tools are designed for two-handed use, which can be a real barrier if you have lost grip on one side. The key is to shift the work to your stronger side and let your body weight do the heavy lifting.
- Pole mounting: Fit a sturdy clamp or strap (often sold as “tool-on-pole” kits) to the handle, then slide it onto a lightweight aluminium pole. This turns a hand pruner into a reach-tool, letting you stand upright and use your body weight to pull rather than pinch.
- Spring-return secateurs: For one-handed cutting specifically, look for secateurs with a spring-return or ratchet mechanism – the blade reopens on its own, so you only need enough grip to close it, not to fight it open again afterwards.
- Support platform: A sturdy garden kneeler doubles as a low stool and a stable base for tools, reducing the need to bend and giving you a solid surface to rest a pole-mounted tool on.
Budget note: A basic pole clamp kit can be sourced for around £10–£15 from garden suppliers, and a decent EVA-foam kneeler-stool typically runs £25–£35. Neither is a big outlay against the difference it makes to a session in the garden.
Caution: Mounting tools on a pole adds leverage, so be sure the clamp is tight and the pole is in good condition. A slipped tool on the end of a long pole is a safety hazard.
Frequently Asked Questions
Does plumber’s tape damage the tool handle?
No, the tape is entirely non-abrasive and simply adds a thin, high-friction layer. Because it grips itself rather than using a sticky adhesive, it peels off cleanly if you ever need to refurbish the tool or pass it on to someone else.
Can I use an Easi-Grip attachment on any tool?
The add-on handle clamps onto straight shafts up to about 40mm across, which covers the vast majority of UK trowels, forks, hoes, and rake handles. It is not designed for secateurs or other tools with a pivoting double handle – for those, a spring-return cutting mechanism solves the same weak-grip problem in a different way.
Is it cheaper to buy new tools or modify the ones I have?
Modifying is almost always cheaper. For minor grip issues, the DIY tape or tubing solutions cost under £5 per tool. Even if your grip loss is more severe, buying an Easi-Grip kit is generally more cost-effective than replacing an entire shed full of tools, especially if you already own high-quality blades and forged steel heads.
Start With the Tape, Not the Toolbox
Here is the order I would actually work through this in. Start with the tape – it costs next to nothing and tells you within a week whether extra grip alone solves the problem. If a handle still feels unmanageable once it is thicker and textured, that is your sign to spend on tubing for the long-handled tools and, for anything you use daily, a proper Easi-Grip handle. Only jump straight to the paid attachment if you already know from experience that padding alone was never going to be enough – for a bad flare-up of arthritis in both hands, for instance, it is a reasonable place to start rather than a last resort.
Do not let a weak grip keep you out of the garden. Have a look in the shed, pick the tool that gives you the most grief, and try adapting the handle this weekend.
If you have tried a method and it is not doing the job, or you are unsure which attachment fits your favourite spade, get in touch via the contact page – I am always happy to help you sort it out. Keep those hands busy, and the garden will keep rewarding you. Happy gardening!
Related Guides
For a complete overview, see our One-Handed Gardening: Adaptive Tools and Setup Guide.
Who I Leaned On For This
Where this piece goes beyond my own workshop tinkering, it draws on Arthritis UK’s advice on adapting grip and spreading load to protect joints, Thrive’s condition-specific guidance as the UK’s gardening-for-health charity, and the Royal Horticultural Society’s general guidance on ergonomic tools and gardening safely.
Worth saying plainly: as an Amazon Associate I earn from qualifying purchases, and every product linked above is something I would genuinely use or recommend in my own garden, not just a convenient affiliate pick. None of this replaces one-to-one advice, though – if a health condition is affecting your hands, check specific product compatibility and safety with a qualified professional or the manufacturer before you buy.