Gardening After Joint Replacement: Safe Tools and Expectations
As an Amazon Associate I earn from qualifying purchases. This page contains affiliate links — if you buy through them, I earn a small commission at no extra cost to you.
Getting back into the garden after a hip or knee replacement is entirely possible, but you have to treat your new joint with respect. Rushing back to double-dig a border is a fast track back to the ward. Adapting how you work—swapping deep bends for raised beds and heavy lifting for ergonomic tools—is what keeps you gardening safely while that joint heals.
The Early Weeks: Why the Tools and the Garden Design Matter So Much
The one thing to take from this whole article: I am a gardener, not a physiotherapist or a surgeon, and nothing here is medical advice. Recovery protocols after a hip or knee replacement vary a lot – by the specific procedure, the surgical approach, and your own surgeon’s judgement. The restrictions on bending, twisting, and lifting that matter for YOUR joint come from YOUR surgical team, not from a gardening website. NHS recovery guidance and Arthritis UK are both worth reading, but your surgeon or physiotherapist’s specific instructions always take priority over anything general written here.
What I can genuinely help with is the gardening side once you know your own restrictions: which tools and garden layouts let you stick to “no deep bending,” “no twisting,” or “no heavy lifting” – whatever your own team has told you – without giving up the garden entirely in the meantime.
Weeding a low border with a traditional hand fork, before checking what your own surgeon’s guidance actually allows, is exactly the kind of well-meaning shortcut that can end in a scare and a trip back to the clinic. The lesson isn’t a specific timeframe – it’s that the tools and the layout matter more than willpower, and it’s always worth checking your own restrictions before you pick up a trowel.
When Is It Safe to Start Gardening Again?
This is entirely a question for your surgeon or physiotherapist, not a gardening guide – recovery speed and the specific restrictions on bending, twisting, and lifting depend on your procedure and your own healing, and only your surgical team knows what applies to you.
Good pain vs. bad pain (general, not a substitute for advice): A dull ache that eases after a short rest is often just muscles adapting to activity. Sharp, stabbing, or lingering pain that worsens is always worth stopping for and mentioning to your surgical team – don’t try to push through it.
Pacing tip once you’re cleared for light activity: Several short sessions tend to be easier on a healing joint than one long one. If your team has cleared you for light gardening, start smaller than you think you need to and build up.
For a deeper dive on adapting your routine once you know your own restrictions, have a browse through our blog.
Tool Selection: The Ergonomic Upgrade
The right tools are the difference between a pleasant stroll among the roses and a painful tug‑of‑war with your prosthesis. Below is the kit I rely on now that my knees and hips ask for a little extra help.
Kneeling and Ground-Level Work
Whether kneeling is off the table for you at all is worth asking your surgeon directly - some hip and knee replacements rule it out for months, others do not restrict it much once you are healed enough. The tools below cover both answers.
- Burgon & Ball Kneelo Knee Pads (paid link) - these are strap-on foam pads, not a seat: a core of shock-absorbing EVA foam between two layers of memory foam, held on with adjustable straps. If your team has cleared brief kneeling, they take far more of the point-load off the joint than kneeling on bare soil or a thin mat. Around £17-£22.
- A rigid-framed kneeler-seat with side handles - if kneeling has been ruled out completely, this is the better fit: the frame gives you something solid to push up from without loading the knee, and it flips to a low seat for weeding without bending. A cheap foam pad does not do this job - on wet ground it compresses and slides, which is exactly the kind of sudden scramble that risks twisting a healing hip.
- Draper EVA Foam Kneeler - a straightforward foam-filled pad, softer than kneeling on soil directly, and a genuinely budget-friendly option if brief kneeling is something you have been told is fine.
Check Burgon & Ball Kneelo Knee Pads price → (paid link)
The real distinction is not price, it is whether the design takes weight off the joint entirely or just cushions it - match that to what you have actually been told you can do.
The “Weak Grip” Solution
- Peta Easi-Grip Trowel - a short, wide-blade trowel with a rubberised, oversized handle that spreads the force across the palm. Around £12-£15.
- Fiskars PowerGear secateurs (paid link) - these use a geared cam mechanism rather than a plain pivot, so the handle multiplies your grip force through the cut instead of asking for it all in one squeeze. The 20cm model runs about £25-£35, depending on retailer.
See Fiskars PowerGear secateurs on Amazon → (paid link)
Compare that with a standard Fiskars secateur with no gearing - you will need substantially more grip strength for the same cut. The mechanism does the work for you, and the larger handle means you do not have to clench your fingers so hard.
The “One‑Handed” Solution
When the opposite arm is still in a sling or simply fatigued, a single-hand version of the same PowerGear line lets you prune without needing a second hand for support. The only downside is a slightly slower cutting speed compared with classic shears, but the trade‑off is negligible when you’re protecting a fresh joint.
The “No Bending” Solution
- Fiskars Xact weed puller (paid link) - Fiskars call this one the Xact Extractor: a compact, roughly 40cm tool with a sharp stainless blade and a softgrip handle that levers a weed out by the root instead of relying on finger strength. It is shorter than a standing tool, so you will still be stooped rather than fully upright - if staying completely upright matters more to you, look instead for the longer, roughly 1m standing pullers that Fiskars and others make. Priced around £10-£16.
- Spear & Jackson Classic Weed Puller - a cheaper alternative at roughly £15-£20, but the grip is narrower and can cause more wrist twist on larger weeds.
See Fiskars Xact weed puller on Amazon → (paid link)
Light‑Weight Power Tools
For larger jobs, a cordless hedge trimmer (Bosch’s 18V UniversalHedgeCut or AdvancedHedgeCut range, roughly £105-£155) is lighter than petrol models and has instant torque that does not require a firm push. A battery-powered mower (Ryobi’s 36V cordless range, typically £200-£350 depending on cutting width and battery size) eliminates the heavy kick-start of a petrol mower and can be pushed with minimal effort. The trade-off is reduced run-time; keep a spare battery handy for a longer session.
Budget‑Friendly Alternatives
If you’re watching the pound, the Wilko Light‑Weight Hand Fork (£8‑£10) works for light soil loosening, though it’s not as robust as the Burgon & Ball kneeler for prolonged use. The Gardenline Ratchet Secateurs (£20-£25) use a simpler ratchet with fewer stages than the Fiskars gear mechanism, so you will feel a slightly heavier squeeze.
All these tools are readily available at B&Q, Dobbies or online via Amazon UK. The key is to match the mechanism to the movement you’re trying to avoid – less bending, less twisting, less grip‑force.
Garden Layout & Ergonomics
Your garden’s design can either amplify strain or act as a silent ally, and a few modest changes make a real difference while you’re still in the recovery phase.
- Raise your planting zones - anything lower than 60cm forces a bend at the hip or knee. Waist-high raised beds (70-80cm) let you plant, weed and harvest standing upright. A DIY timber bed from a local timber merchant runs roughly £100-£150 for a 2x4m unit; the Garden Trading Raised Bed Kit (£120-£180) comes pre-drilled if you would rather not build one from scratch.
- Level out your paths - tripping is the biggest risk to a new joint. Aim for at least 90cm width, clear of loose stones and uneven paving; a smooth, compacted gravel or paved surface stops you having to step awkwardly.
- Set up seating stations - prolonged standing aggravates joint stiffness, so keep a sturdy garden stool or a rigid kneeler-seat within reach of your most-used beds and sit down for a few minutes every half hour.
- Upgrade your watering system - a 2-litre can with a 1-metre spout lets you reach borders from standing; a trigger-nozzle hose (around £12-£18) gives a steady flow without lifting the weight of the water.
These tweaks are cheap enough to put in gradually, and they pay off in reduced strain every time you are out there.
Managing Expectations: Pacing and Fatigue
Even with the perfect tools and raised beds, you won’t be able to tackle the whole garden in one go. The truth is, your body is still rebuilding strength, and over‑doing it can set you back weeks.
- Quality over quantity: Aim for a 10‑minute gardening window, then rest. A short, enjoyable session beats a painful hour that leaves you limping.
- The 10‑minute rule: If you feel any sharp pain, stop immediately – it’s your body’s way of saying “enough”.
- Plan ahead: Use recovery time to sketch out a planting scheme, order seeds, or research companion planting. When you’re fully back, you’ll have a ready‑to‑go plan and won’t need to rush.
By treating the garden as a series of small, manageable tasks, you protect the joint and keep the hobby enjoyable.
Frequently Asked Questions
Can I use a lawnmower after a knee replacement?
Yes, but you should avoid heavy petrol mowers that require a firm forward push. A lightweight cordless battery mower or a hover mower lets you glide across the grass with minimal knee flexion. If you’re unsure, hiring someone to cut the grass for the first few months is the safest bet.
How long before I can dig again?
That’s a question for your surgeon or physiotherapist, not a gardening website – it depends entirely on your procedure and your own healing. What I can say is that once you’re cleared for it, starting with a small hand trowel in a waist-high raised bed is far easier on a healing hip or knee than ground-level digging with a full spade, and stopping immediately for any sharp pain is always the right call regardless of how long it’s been.
Is it safe to weed by hand?
Only if you can do it without kneeling or deep bending. A long-handled weed puller lets you stand completely upright, removing the weed by the root without forcing your new joint past a safe angle. Hand-weeding at ground level puts far too much strain on a fresh replacement.
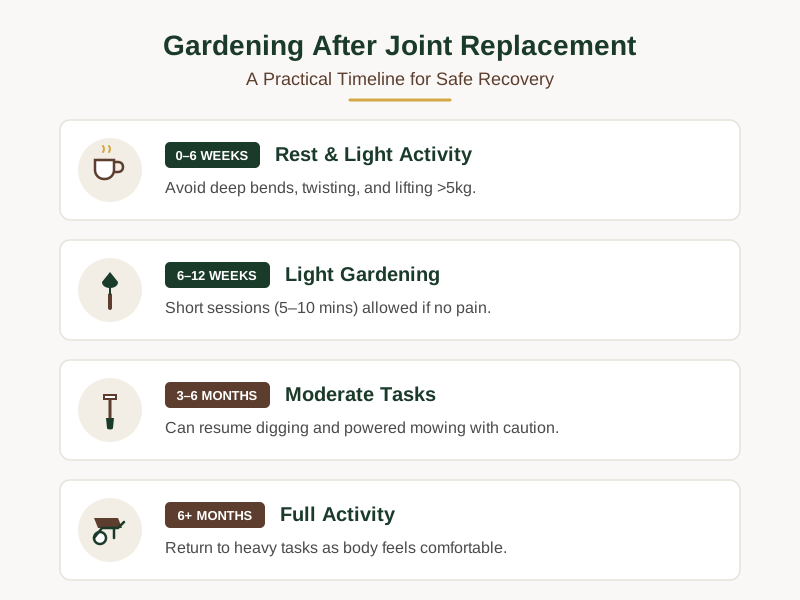
How Gardening Activity Commonly Progresses (Ask Your Surgeon for Your Own Timeline)
Recovery speed varies enormously between people and procedures, so treat this only as a general shape of what most people experience, not a schedule to follow – your surgeon or physiotherapist’s specific guidance always overrides this.
| General Phase | What Many People Find | Notes |
|---|---|---|
| Early recovery | Rest, with only gentle activity as cleared by your team | Follow your surgeon’s specific restrictions on bending, twisting, and lifting |
| Once cleared for light activity | Short, light gardening sessions | Stop immediately for any sharp pain; build up gradually |
| Later in recovery | Gradually returning to more physical tasks like digging or mowing | Only with your surgical team’s confirmation that you’re ready |
| Fully recovered | Return to whatever your surgeon confirms is appropriate | Timing is individual – there’s no universal date for this |
When Your Team Gives You the Go-Ahead
You now have a clearer picture of the tools and layout choices that take the strain off a healing joint, once your surgeon or physiotherapist has told you what your own recovery allows. The garden isn’t disappearing – it’s simply waiting for you to approach it in a way that respects your healing joints.
If you’re ready to audit your current kit and see exactly which items you need, Download the Free Easier Gardening Tool Checklist. It walks you through every essential, from kneelers to long‑handled weed pullers, and helps you spot any gaps before you head out to the garden centre.
Remember, the garden will always be there, and with a few sensible adjustments you can keep enjoying it for years to come. Keep the sessions short, the tools ergonomic, and the expectations realistic – and you’ll find yourself back among the seedlings before you know it.
If you want to know more about the approach behind this site, the short version is: the right kit keeps you going. If you have any lingering doubts, feel free to get in touch or, better yet, have a quick chat with your physiotherapist to get that extra peace of mind. Happy, low‑strain gardening!
Related Guides
For a complete overview, see our One-Handed Gardening: Adaptive Tools and Setup Guide.
What I Checked Before Writing This
The medical framing above leans on NHS guidance on hip replacement recovery, NHS guidance on knee replacement recovery, and general information from Arthritis UK. None of it replaces what your own surgical team tells you - treat it as background reading, not a protocol to follow instead of their advice.
As an Amazon Associate I earn from qualifying purchases. The products linked above are ones I would genuinely use in my own garden. This guidance is for informational purposes only - always follow the specific protocol your surgeon gives you over anything general written here.