How to Measure Your Perfect Wheelchair Garden Bed Height
Search for the ideal raised bed height for a wheelchair and you’ll get a single confident number back, usually pitched somewhere around waist height. It sounds authoritative. What it glosses over is that “waist height” varies by a good 25cm depending on whose chair, whose reach, and which side of the bed you’re working from. Get it wrong and you don’t end up with a mildly awkward bed — you end up with one you genuinely cannot work from a wheelchair, which is how a lot of these projects quietly get abandoned. The fix isn’t a single figure someone else worked out for you; it’s a short bit of measuring against your own body, checked against what the real accessibility guidance actually supports.
How Do You Calculate the Ideal Raised Bed Height for a Wheelchair?
There’s no single official figure, but there is a workable method: aim for a height roughly midway between the top of your wheelchair seat and where your relaxed forearm naturally rests with your elbow bent at 90 degrees. That keeps you upright rather than hunched forward or reaching up past a comfortable shoulder position. Where this actually lands depends heavily on your own seat height and reach. For beds worked from one side only, the gardening charity Thrive specifies 615mm (about 61.5cm), with a maximum reach depth of 500mm; taller builds intended for standing or part-standing use can go up to around 85cm. Measure your own numbers rather than assuming the higher figure is automatically right for you.
When you sit in your wheelchair and reach for the soil, that 90-degree bend—like you’re holding an invisible steering wheel—keeps the spine neutral and the shoulder joint clear of impingement.
Formula:(Wheelchair Seat Height + Forearm Length) ÷ 2 = Ideal Bed Height
By sitting halfway between the seat and the tip of your forearm, the elbow sits level with the bed surface. You’re not forced to lean forward (which compresses the lumbar spine) and you’re not reaching up so high the shoulder muscles fire unnecessarily.
How to Measure Your Ideal Bed Height
Step 1: Measure your seat height. Run a tape measure from the floor to the top of your wheelchair seat. Do not include the cushion if it compresses heavily when you sit on it. Step 2: Measure your forearm. Sit comfortably with your arm relaxed at your side, bent at a 90-degree angle. Measure from the elbow crease to the tip of your middle finger. Step 3: Calculate the midpoint. Add the seat height and the forearm length together, then divide by two. This gives you the exact height the top of your raised bed needs to be.
Quick calculator for common seat heights
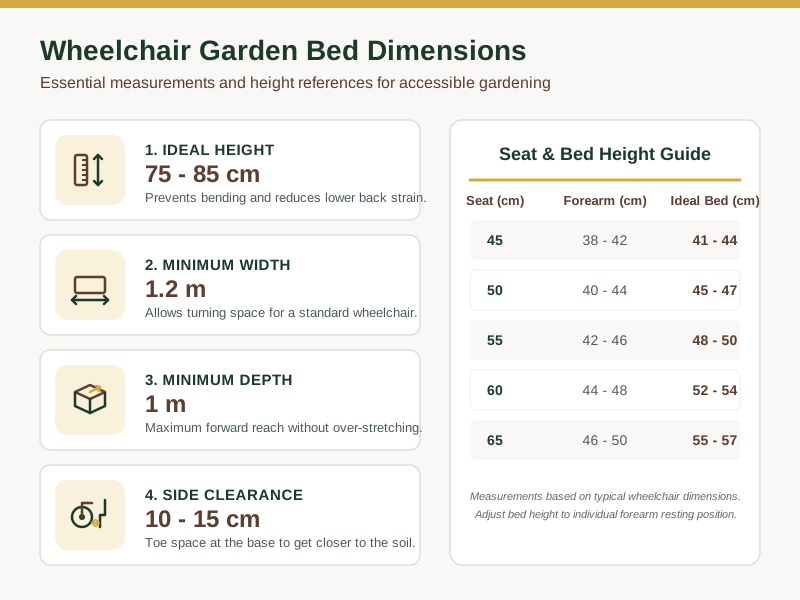
| Seat height (cm) | Typical forearm (cm) | Ideal bed height (cm) |
|---|---|---|
| 45 | 38‑42 | 41‑44 |
| 50 | 40‑44 | 45‑47 |
| 55 | 42‑46 | 48‑50 |
If your own seat and reach numbers differ from the table, just plug them in. As the table shows, the answer for a lot of wheelchair users actually lands well below the “waist-high” figure often quoted online – closer to Thrive’s 61.5cm than to 85cm. Treat 85cm as a ceiling for taller or part-standing builds, not a default target.
A bed built to a generic plan rather than your own measurements can easily miss the mark in either direction, and that gap is often exactly what turns a comfortable session into a sore shoulder – or a sore lower back – the next day.
For anyone who also needs a sturdy seat while they’re at ground level, a good kneeler can be a handy backup when you need a lower work surface. We talk a lot about adapting your setup over on the blog, and a decent stool is often the first step.
Why Waist Height Beats Knee Height
Knee‑height beds sit roughly 30‑45 cm off the ground. To work at that level you have to hunch forward, increasing lumbar flexion and placing extra load on the discs – a recipe for back pain after just a few minutes. Waist‑high beds (around 75 cm) let you sit upright, keeping the spine in its natural curve. Think of the difference between typing at a desk versus slouching over a kitchen table; the former feels natural, the latter leaves you aching.
A waist‑high bed also benefits anyone lending a hand, whether it’s a carer or a grandchild helping with a transplant. Everyone can reach in comfortably without stooping, making the garden a shared space again. The gardening for health charity Thrive heavily champions this sort of upright, accessible gardening because it simply keeps people growing things for longer.
If you still need occasional low‑ground work, a low‑step stool or a sturdy garden stool can fill the gap without compromising the main bed height.
Wheelchair Turning Radius & Width
A bed that’s too narrow will trap the wheelchair, turning the garden into a maze of frustration. UK government inclusive mobility guidance puts the turning space a skilled manual wheelchair user needs at 1.5 m (1500mm), square or diameter, for a full turn – noticeably more than the 1.2 m you’ll often see quoted as a general path width. Powered or outdoor wheelchairs need more again, up to roughly 2.4 m for some models, so build in extra margin if you know one of those will be using the space. Anything tighter than 1.5 m and you’ll end up fighting the frame rather than enjoying your tomatoes.
📺 Watch: Accessible garden ideas - how to make a garden everyone can enjoy — The Middle-Sized Garden
- Depth: Keep it to around 60 cm (24 in) if you’ll only ever reach in from one side – that’s the figure most accessible-gardening guidance treats as a safe seated reach before you’re stretching. A bed accessible from both sides, or from a corner, can go deeper, up to roughly 1.2 m, but don’t assume a single-approach bed can be worked that far in without leaning.
- Side clearance: Add another 10‑15 cm on each side if you plan to use a walking frame or a companion’s assistive device.
Minimum space checklist
- Clear path of at least 1.2 m from the garden gate to the bed’s front edge.
- Turning space of 1.5 m at the bed itself – the standard figure for a manual wheelchair, not just bariatric chairs; allow more again for powered or outdoor models.
- Depth of around 60 cm for single-side reach, or up to 1.2 m if the bed is accessible from both sides.
If your garden is tight, consider a L‑shaped layout that follows the existing pathway rather than forcing a straight‑line approach.
Now that you know the dimensions, you can sketch a plan that fits your path without a faff.
Ready to map it out? Grab our free resource that walks you through the full layout process – Download the Free Easier Gardening Tool Checklist.
Surface Materials & Drainage
📺 Watch: Gravel Paths - The Hard Truth! My 10 Things to Consider — Niall Gardens
Choosing the right timber
- Cedar or redwood – naturally resistant to rot, great for the damp UK climate, and they stay light enough to move if you ever need to re‑position the bed.
- Pressure‑treated softwood – a cost‑effective alternative, but check it’s rated Use Class 4 (the UK standard for timber in permanent ground or soil contact, under BS 8417) rather than a lower grade meant for above-ground use only.
Drainage is key
High beds dry out faster because water runs straight through the side drains. Line the base with a permeable membrane (often sold as “landscape fabric”) and fill with a 50:50 mix of topsoil and well‑rotted compost. This blend holds moisture yet drains quickly enough to prevent waterlogging.
Watch out: Water can collect in the centre of a wide bed if the base isn’t level. A simple solution is to add a shallow “drain trench” of 2‑3 cm wide, running lengthwise under the centre, then cover with gravel before the soil mix. It’s a small extra step that saves a lot of hassle later, especially when you can’t easily step into the middle to splash water out.
UK‑Specific Considerations
Planning permission
A standalone raised bed is very rarely a planning issue — it’s a garden feature, not a building. Where it can get more complicated is if the bed is built as part of a larger fixed structure (a permanent deck, a retaining wall, or anything attached to the house). If in doubt, a quick check with your local council’s planning department or the Planning Portal — the official government guidance site — will confirm whether anything you’re planning needs a look.
Building regulations
If the bed becomes part of a permanent deck or is anchored to an existing wall, accessibility-related Building Regulations may apply. The rule of thumb is: if the structure is fixed and intended for regular use by a wheelchair user, it’s worth flagging to the council before you build. It’s cheap insurance against a surprise stop-work notice.
Frequently Asked Questions
Can I use a raised bed if I use a bariatric wheelchair?
Yes, but you will need to build a much sturdier frame to handle the extra weight if you bump it. Use 100mm (4x4 inch) timber for the side rails and ensure your path width is at least 1.5m to accommodate the wider turning radius. Reinforcing the inner corners with heavy-duty metal brackets is also worth the few extra quid for peace of mind.
What if I don’t have a wheelchair but have a bad back?
The exact same elbow-angle formula applies if you are gardening from a seated position. Measure your seated elbow height from the floor to the point where your forearm naturally rests while sitting on your garden stool, then use that calculation to set the bed height. It completely removes the need to flex your lumbar spine while you weed.
Can I build a wheelchair‑accessible bed on a slope?
It is always best to start on level ground, because a sloping site plays havoc with drainage and makes a wheelchair unstable. If you absolutely must build on a slope, use retaining blocks or a low retaining wall to create a completely flat, paved platform first, and double-check that the top surface is perfectly level before you assemble the bed.
Measure Twice, Build Once
The takeaway is simple: measure, calculate, and build to those numbers. Align the bed height with your elbow, give the wheelchair at least 1.5 m of width to turn, pick rot‑resistant timber, and mind the drainage. When the bed fits your body, the garden becomes a place of enjoyment again, not a source of pain.
If you’re ready to pull the plan together, the next logical step is to map out all the elements – dimensions, materials, and any extra accessories like a low‑profile watering hose. Our Free Easier Gardening Tool Checklist walks you through that checklist, ensuring nothing slips through the cracks.
Download the Free Easier Gardening Tool Checklist and keep the momentum going. (And if you want to know a bit more about why these mechanics matter this much, you can read more about this site here).
Got a specific snag or need a second opinion? I’m just an email away – feel free to get in touch. Happy, strain‑free gardening!
Related Guides
For a complete overview, see our Gardening with a Bad Back: Tools to Stop Bending and Strain.
What the Guidance Actually Says
The firmer figures here come straight from published sources: the 1.5 m turning space is the UK government’s Inclusive Mobility guidance, and the 61.5 cm one-side-access height is Thrive’s own build guidance, not a rounded-off guess. Depth, timber grade and your personal bed height are more variable, which is exactly why the formula earlier in this piece exists – use it, measure yourself, and treat any single number you read online, including the ones here, as a starting point to check against your own chair and reach, not a substitute for it. If a planning question comes up along the way, the Planning Portal is the place to check before you build, not after.